By Grant Laidlaw
Many people ask for assistance in understanding theoretical and practical aspects of the industry. I will endeavour to enlighten. We are going back to basics as I have questions coming in that indicate that the basic understanding necessary to work in industry is not in place.
 |
Grant Laidlaw is currently the owner of the Air Conditioning and Refrigeration Academy (ACRA) in Edenvale. He holds a Bachelor of Business Administration and an associate degree in educational administration. He has a National TechnicalDiploma and completed an apprenticeship with Transnet. He has dual-trades status: refrigeration and electrical. He has been involved with SAIRAC for over two decades and served on the Johannesburg committee as chairman and was also president between 2015 and 2018. Currently he is the SAIRAC national treasurer. |
| Sipho: Mr Grant, could you please help us with an understanding of pipework insulation? How do we use this in air conditioning? Is it important to use glue? Thank you. |
Hi Sipho, yes, I can help. We are speaking about the insulation of tubing for copper piping, being a foamed insulation tailored to prevent condensation in copper piping on air conditioners. The insulation is a flexible, elastomeric nitrile closed-cell foam insulation designed to protect pipes from heat loss and condensation. It’s commonly used in air-conditioning and refrigeration systems for small to medium-sized pipes, improving energy efficiency and preventing moisture buildup.
There are different types on the market, the solid type that is slid over the tubing. The slip-on method of installation is used when you can insulate new piping before an installation.You can cut the insulation open for installed piping or use the zip type.
You will need the correct size armour flex, adhesive, good adhesive brushes and a sharp utility knife. Apply insulation only when the pipes are clean. Since rubber insulation, a closed-cell rubber, is flexible, it will follow bends in tubing and can be slipped right over bent tubing, 45° sweat elbows, 90° sweat elbows and couplings.
General guidelines
- Always use tools that are in good condition
- Only apply insulation to clean pipes at room temperature
- Never stretch the insulation; it is in fact better to compress the insulation slightly
- Try using insulation sections that are as long as the piping being insulated
- Allow some gap between piping; this allows for air circulation, which will serve as an additional safeguard against possible condensation. This is particularly applicable in hot, humid climates.
Yes, Sipho you must use glue as all of the insulation joints must be properly sealed. This is called a ‘vapour barrier’ and minimises heat transfer and controls condensation. Should condensation be allowed to enter the joints, corrosion may occur in addition to water dripping, causing possible water damage.
Ultraviolet radiation (the sun) degrades the insulation material, causing the insulation to break down into a powder and ultimately causing failure of the insulation. When using insulation outdoors, the insulation must be protected either by trunking or painting. Use paint in accordance with the insulation manufacturer’s instructions. With regards to double insulation, stagger the side and end joints. Do not compress the piping insulation at columns, duct hangers, etc. The maximum allowed is 10% compression in order to maintain the thermal efficiency. In addition, condensation may occur where the insulation is compressed.
Constructing 90º elbow
At times, it may become necessary to construct 90º elbows to fit over existing bends. In order to form a 90º elbow, simply cut through the insulation at 45º. Reverse the position on one side to form the elbow. Next, cut open the inside wall of the elbow, and the split-open elbow will fit over the tubing. Apply approved contact adhesive to the slit open portion and join by pressing the seams together. Apply adhesive and join together the corners of the elbow in the same manner. Finally, one can apply adhesive to the butt ends and seal.
Existing pipework
When working with existing refrigerant pipework, one can use zip-type insulation. Should this not be available one can, using a sharp utility knife, slit straight down the length of the insulation.
Place over the refrigeration pipe and proceed to brush coat the slit ends with adhesive. Allow to dry until slightly tacky and press together the split ends. Take care not to stick the insulation to the tubing.

Correct cutting technique. All images supplied by Grant Laidlaw
Place the slit tube onto the clean pipe; apply a thin, even film of adhesive to the two cut edges using a short bristle brush. Apply the adhesive along the tube length.
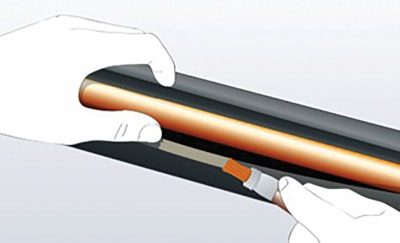
Application of adhesive
Allow the adhesive to tack dry, then test with the fingernail.
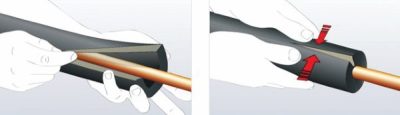
Using gentle pressure to join the edges of the insulation.
Free the seams from the pipe where applicable, align the edges and press the seam detail with firm, even pressure to finish.
For new installations
You simply slip a length of insulation over the pipe or copper tubing, as shown below. The inside of the insulation is coated with a powdered dry lubricant, making it easy to slip the insulation over the pipe (you can use talcum powder). This dust must be kept out of refrigeration systems. Plug the open ends of the pipe before installation.
Use insulation pieces as long as the pipe work, keeping joints to a minimum. Always use the insulation that is properly sized and do not stretch it over the tubing. Do not crowd insulation- covered pipes. Space pipes far enough apart to allow for the free circulation of air. Air movement is an extra safeguard against surface condensation of cold pipes, especially under hot, humid conditions.
All piping insulation must be properly sealed to minimise heat loss and control condensation. On cold lines, open pipe insulation joints may allow the formation of condensation.
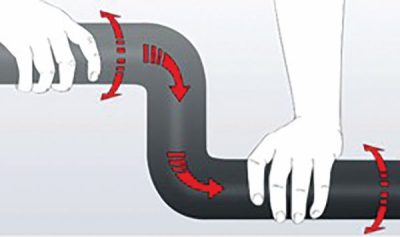
Twisting technique.
In principle, tube material can simply be slid around bends. Using rotational movements while pushing can ease the process.
Note: Always apply and push the insulation tube over the pipe as shown, making sure that the longitudinal seam is arranged to the side but neither to the throat nor to the back area.
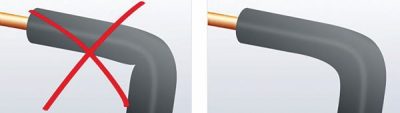
Kinked insulation.Gran
Should the insulation kink, the calculated insulation thickness is then no longer achieved, and condensation can occur on the surface of the insulation. When installing tubes with a self-adhesive seal, there is the additional risk of compression of the adhesive lining in the bend area, which can lead to seams coming apart.
The following should be taken into account in these cases: If the insulation kinks and the adhesive seam is compressed, the bends should be cut into segments to fit. In such cases, it is recommended to use standard, non-self-adhesive, tubes.
Using adhesive correctly
Always follow the manufacturer’s instructions. Before use, always shake off the adhesive thoroughly. Decant small amounts to prevent the pot from drying.
Use a brush with short, stiff bristles and apply adhesive in a thin, uniform layer to both surfaces to be joined. Adhesives can become tacky within 2–5 minutes after application. This time will vary according to ambient temperatures and relative humidities. Avoid ‘open times’ in excess of 10 minutes.
Allow the adhesive to ‘tack dry’. The correct initial drying period can be checked by using the ‘fingernail test’. Touch the surface with a fingernail. If the surface feels tacky and your fingernail adheres to it, the joint may be closed. If the surfaces are left to dry for too long a period, they will not adhere when pressed together. In this case, reactivate by applying another layer of adhesive. Do not leave glued seams on the top of the insulation in external locations. When working outdoors, always turn the glued seams away from the sun.
Pipes with corrosion protection
Check that the adhesive will adhere to any rust-inhibiting primer that has been used to protect pipes. Standard adhesives should be compatible with all coating systems based on epoxy resin or polyurethane. Adhesives may not adhere to asphalt, bitumen or red lead.
When gluing joints under compression, with no gaps present, the wet adhesive method should be used. Pull the seam apart slightly and apply the adhesive thinly and evenly with the brush to both surfaces and press together. No open time is needed in this case.
High atmospheric humidity and high temperatures lead to faster evaporation of the solvent in the adhesive. This means that a film of moisture may appear on the surface of the adhesive.
Consequently, the reliability of the adhesive seam cannot be assured as the surfaces to be joined may not bond together.
Under these conditions, the following points may be observed as an alternative: Apply adhesive as normal in a thin, uniform film on both surfaces. Unlike normal bonding, the surfaces to be glued should be held together under pressure while wet. Note: Due to the shorter curing time, adhesive can only be applied to a limited area at a time. Depending on the atmospheric humidity, temperature, material thickness and practical installation conditions, use a tube length of around 1m as a guideline.
To avoid tension within the material and prevent the trapped solvent from opening the seam, seams should be held in place with adhesive tape immediately after gluing. Apply the adhesive tape at right angles to the glued seam every 20cm.
Wet sealing on butt joints
On all cold refrigerant lines, use adhesive to glue the ends of the insulation tubes to the pipe surface. The adhesive should be applied in a width at least equal to the insulation thickness. For
the final wet sealing of the tube/sheet, use fingers to pull the joint apart and apply a thin, even film of adhesive to the two butt joint edges with a small brush. Apply firm and even pressure to the glued joint using fingers and thumbs to finish.
Note: In addition, it is highly recommended that this procedure be followed for all other types of hot pipes located outdoors
Sipho, thank you for your question. I hope that this helps with your installation of insulation over refrigerant piping. Remember, do not compress the insulation more than 10% of its thickness. We often see this issue when technicians are using cable ties pulled up to tight.
References:
- ACRA
- ASHRAE
- Armaflex